Gluten-Free Peach Cobbler

Gluten free peach cobbler recipe
This is not Betty Crocker's Gluten-Free Bisquick mix. Nope.

Is Mercury in retrograde?

And if so, Darling, do I believe it can wreak havoc with recipes? I started out with a different approach to this peach cobbler recipe, you see. I thought I'd try out the new Betty Crocker Gluten-Free Bisquick mix I bought this week. I imagined a golden topped biscuity crust you could sink your teeth into, a melt-in-your-mouth forkful of shortcake, dripping with warm and sticky-sweet juice.

But what I got was a bone white mound of anemic dough (scarily reminiscent of Play Dough) baked into what can only be described as yesterday's mashed potatoes. It didn't even try to turn golden. And it didn't melt in your mouth like a biscuit. It just sat there on your tongue. Flavorless. Bored. Expecting to be admired without effort. Like those fame junkies who are famous for simply being famous. They haven't actually accomplished anything to garner their celebrity status. They just nurture a deeper narcissistic ambition than your average high school beauty queen. They expect adulation because they exist.

Like an awful lot of the gluten-free foods churned out by corporate entities.


Continue reading

Perfecto Graham Cracker Crust . . . Works for Me Wednesday

works for me wednesday at we are that family

Here is my recently discovered trick for making perfect graham cracker crusts....use a measuring cup to press the crust mixture into the pie pan!

Using a measuring cup helps keep the crust even, makes the sides pretty and keeps your fingers from getting buttery.  (Not that buttery fingers were ever a BAD thing.)

{If you're so inclined, you can even lick the bottom of the measuring cup when you're finished. I'm not saying I did that.}

This is a great recipe for graham cracker crust...I used it again this week for Mr. E's birthday pie.  More on that later....

Graham Cracker Crust
{source: Betty Crocker Cookbook (Bridal Edition) }

1 and 1/2 cup finely crushed graham cracker crumbs
1/3 c. butter, melted (I used salted)
3 TBSP sugar

Preheat oven to 350.

Combine all of the ingredients.  Press into the bottom and sides of a 9" pie pan. 
Bake 10 minutes.  Let cool completely before filling.

So simple and utterly yummy!  Graham Cracker Crust works for me!  What's working for YOU this week?

It's the Most Wonderful Time of the Year . . .

...or it will be in 3 days.  Are you ready?  Are you ready for PUMPKIN season?

My sister has a laugh at my expense every year because once September 1st rolls around, it is all-pumpkin-all-the-time around here.  It becomes a slight obsession.

{PS....Starbucks, I'll be at your door Wednesday morning....hoping those Pumpkin Cream Cheese Muffins are in the bakery case.  And if they're not, be prepared for some tears.}

I want you to be prepared, so here is a little pumpkin bread recipe for you. 

Pumpkin Bread
{Just slightly modified from my girl, Paula Deen 's The Lady & Sons Savannah Country Cookbook}

3 and 1/3 c. flour
2 tsp. baking soda
1 and 1/2 tsp. coarse salt
1 tsp. ground cinnamon
1 tsp. freshly ground nutmeg
3 c. sugar
1 c. vegetable oil
4 eggs
1 (15 oz) can pumpkin
2/3 c. water
1/4 c. pumpkin seed kernels

Preheat oven to 350.  Grease and flour 2 loaf pans.

Combine flour, baking soda, salt, cinnamon and nutmeg.  Set aside.

{If you're wondering about what whole nutmeg looks like, this is it.  There are fancy nutmeg graters, but I just use my small handheld grater with the tiny holes.}

Beat the sugar and oil together until combined.  Beat in the eggs and mix, scraping down sides of bowl as needed.  Add pumpkin and blend.  Add the water and blend completely.

Slowly add the flour mixture and beat on low until combined.  Pour into loaf pans.

Roughly chop the pumpkin seed kernels, I like to leave some whole, and sprinkle on top of batter. (I got these in the bulk section of my grocery store.)

Bake for 1 hour, or more, until a toothpick inserted in the middle comes out clean.  Cool in the pans on a cooling rack for 15 minutes.  Remove from pans and let cool completely.

Want more pumpkin?  Here are some goodies from last year...

1. Pumpkin Chocolate Chip Bars
2. Pumpkin Whoopie Pies
3. Pumpkin Cream Cheese

Happy Pumpkin Season, Everyone!!!

Heirloom Potato Salad

Vegan potato salad recipe made with tiny heirloom pink, purple and yellow potatoes and vegan mayo
A super easy potato salad with tasty heirloom spuds. Vegan and egg-free.

I snatched up a bag of those cute little potatoes at the market yesterday. You know the ones I'm talking about. Those baby sized spuds as cute as a button. In Easter egg colors like custard and purple and pink. So sweet and adorable you want to cradle the bag and speak in your talking-to-kittens voice. Heirloom root vegetable deliciousness. Yeah, you shell out a little extra cabbage for these pretty babies, true. But I say, live a little. Indulge in excellent ingredients.

You only got one life. 

Continue reading

Cookies for Baby's Baptism

When a fellow volunteer at the food pantry asked me to make cookies for her sweet baby's baptism, I was so honored!

Kara is one of those really organized people.  She even provided me the cookie cutter, just like she did when I made cookies for her sister's 40th birthday party Come to think of it, Kara, would you like to be my personal cookie cutter shopper? 

Anyhoo, back to the cookies...the napkins for the party were a pretty yellow with a dark brown cross, so we added a branch for the dove to carry to incorporate those colors.

{This idea came from a magazine that I saw YEARS ago. It was a Christmas dove carrying a holly branch.  So, keep this in mind; Christmas is only 122 days away, people!}

To make the cookies, you'll need:
  • royal icing in white, brown and yellow (Americolor Bright White, Chocolate Brown and Egg & Lemon Yellow)
  • tips: #2 and #1
  • disposable icing bags
  • squeeze bottle
Using a  #2 tip, outline the cookie in white royal icing. 

Thin the white icing (reserve a bit for later) with water, a little at a time, until it is the consistency of thick syrup.  Cover with a damp dishtowel and let sit several minutes.

Stir gently with a rubber spatula to pop any large air bubbles that have formed. Transfer to a squeeze bottle.

Fill in the outlined cookie with the flood icing.  Use a toothpick to spread into sides and corners.

Let sit 1 hour.

With the reserved white icing and #2 tip, add detail on wings, tail and add an eye.

Using another #2 tip, pipe the branch in dark brown.

With a #1 tip, pipe yellow flowers/berries on the branches.

Let dry overnight before packaging.

Thank you, Kara, for letting me be part of your baby's big day!

If you haven't already, be sure to enter the giveaway going on right now!  You could turn YOUR blog into a book!

Nectarine Ice Cream with Coconut Milk

vegan nectarine ice cream recipe
Creamy and subtle coconut milk and nectarine ice cream: vegan yum.

It's been hot and sultry here in West Hollywood. [One could argue, when is West Hollywood not hot and sultry, Babycakes?] We've been settling into our new apartment, hanging curtains (adios, vertical blinds), unpacking books, and doing laundry. So before I share the new coconut milk ice cream recipe I whipped up last night (after scarfing down vegan tacos like there was no tomorrow, which would be, today) I thought I might  also share a few random pics from our new neighborhood.

West Hollywood rocks.


Continue reading

Turn *Your* Blog into a BOOK! (a giveaway)

Have you ever wanted to turn your blog into a book?  Not the kind where you write a proposal and send it off to an agent for rejection. {Ahem.} But, an actual copy of YOUR words, YOUR pictures...YOUR BLOG.
I love this giveaway from Blog2Print!

Blog2Print will print your blog in book form.  They have lots of different options.....hard cover or paperback, comments included or not, etc.

For my book, I chose a paperback version without comments.  (Although, I'm thinking of making an entire book of my friend Teresa's comments because, honestly, they are book-worthy!)

Blog2Print also gives the option of placing the pictures exactly as they are on your blog, or condensing your pictures to better fit on the page.  I did the condensed version, otherwise my blog might have been one single post.  You know how I like the pictures!

You also select the date range for printing.  I was able to get my posts about my dad and my Uncle Mike in my book and that makes me very happy!


With the $40 credit Blog2Print generously provided me for a book, mine turned out to be about 90 pages!
I love that someday, I'll be able to give this to kiddo and say, "remember when you were 11 and I was either in the kitchen or on the computer 24/7?  Here's what I was up to."

{I can also show this to my mother-in-law who doesn't have a computer and is wondering just what the heck a "blog" really is. ;)}

To win a $40 credit to Blog2Print of your very own,
just tell me.....what blog would you print? Is it about food, your babies, your travels...?

For an extra entry, tweet:
" Turn YOUR blog into a book...a @blog2print giveaway from @bakeat350tweets! http://ow.ly/2t9u6 "
...and leave a separate comment to let me know you did.


Random drawing to be held Sunday, August 29th at 8pm CST.   Giveaway now closed. Good Luck!

Homemade (chocolate-filled) Nutter Butters

 
After making Frosted Animal Cookies, I guess I had store-bought cookies on the brain.  I had Nutter Butter Brain.  There was no stopping it.

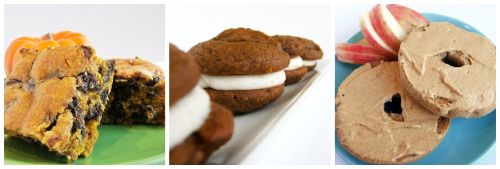
But these are BETTER than Nutter Butters.  These are thick, soft, homemade Nutter Butters topped with peanut butter royal icing (!) and filled with chocolate ganache.  Oh yeah, babe.

First, you'll need the peanut butter cookies.  These are peanut butter roll-out cookies slightly modified from The King Arthur Flour Cookie Companion. Roll them out a bit thinner than you would a regular sugar cookies for decorating since you'll be putting 2 together.

I used my bikini top cutter for the peanut. :)
Next, you'll need peanut butter royal icing.  I had heard royal icing goes wonky if mixed with fat, but I threw caution to the wind and added 4 TBSP of peanut butter to my finished royal icing.  (I also added some brown AmeriColor food coloring.)  The icing *did* deflate and would not form a stiff peak again, but it was thick enough for piping.  It even dried smooth and shiny.

Would I cover an entire cookie with it?  No.  It did crack in places, like here:

Next up, my old friend, chocolate ganache.  Make it, let it set up a bit and pipe or spread it between two cookies.
{Or just eat it by the spoonful, I won't tell.}


Peanut Butter Roll-Out Cookies
{modified from The King Arthur Flour Cookie Companion}

1/2 c. unsalted butter
1/2 c. creamy peanut butter (I used Skippy Natural)
1/2 c. light brown sugar
1/2 c. sugar
3/4 tsp. coarse salt
1/2 tsp. baking soda
2 tsp. vanilla
1 egg
1/4 c. sour cream
3 TBSP cornstarch
3 c. flour

In a large bowl, beat the butter through vanilla until light and fluffy.  Add the egg and beat until combined.

Add half the sour cream, all of the cornstarch and half of the flour; beat well.  Add the remaining sour cream and flour, mixing just until combined.

Divide the dough in half, wrap in plastic wrap and flatten into a disc.  Refrigerate for 1 hour.

Preheat oven to 350.  Line cookie sheets with parchment paper.

Roll the dough on a floured surface with a floured rolling pin and cut with a cookie cutter dipped in flour. (got flour? :))  Place the cut cookies on prepared sheets and pop in the freezer for 5 minutes before baking.

Bake for 10-12 minutes until set.  Remove from baking sheet and let cool completely on a cooling rack.

Now, pipe the cookies with peanut butter royal icing, using a #2 tip.

Chocolate Ganache

1/2 c. heavy cream
6 oz. bittersweet (or semisweet) chocolate, chopped
1/2 tsp. vanilla

Place the chopped chocolate in a bowl. Heat the cream in a small saucepan over medium-low heat until hot and steamy.  Tiny bubbles will appear around the edges.  Pour over the chocolate and let sit 5 minutes.

Stir the mixture until combined, but do not over stir, or the mixture will look "bubbly." (But still perfectly edible...trust me.)  Gently stir in the vanilla.  Let the ganache sit until it has cooled and thickened.
Homemade Nutter Butters, Frosted Animal Cookies ...anyone care to guess what is coming next?!?

Taking Food Pictures at Night . . . Works for Me Wednesday

works for me wednesday at we are that family

My favorite food pictures are ones taken outside or near a window with good light.  But a lot of times, I make cookies at night.  I wanted to take pictures for tutorials, but didn't like posting pictures with terrible nighttime lighting on the blog.

Then I read a post over at Steamy Kitchen about the Lowel Ego Digital Imaging Light.  I bought one...and it works for me.  Let me show you the difference.

This picture was taken at night WITHOUT the light:

This picture was taken at night WITH the light:
Both pictures were edited...brightness and contrast adjusted...but can you see the difference?


What didn't work for me?  The price. $88!  I don't know about you, but if I have an extra $88, I'm getting a cheap pedicure, a cute new pair of shoes, a Starbucks and a cupcake. (Not necessarily in that order.)

I got this for FREE!  Yes, FREE!  Have you heard of Swagbucks?  I heard bloggers talking about it for months before I signed up.  All you do is use Swagbucks as your search engine. (The easiest thing to do is to download the toolbar.) Every so often when you search, you get "bucks."  These bucks can be redeemed for prizes like gift cards from Amazon, Starbucks, Sephora, etc.

THAT'S how I got my light...with "bucks" redeemed for an Amazon gift card. Rumor has it, several bloggers paid for all their Christmas gifts using Swagbucks last year!!!

Now, if someone refers you, that person gets some "bucks."  Please don't feel like you have to sign up referred by me.  If you'd like to, you can here.  OR, just go the home page and sign up on your own.

Here's what I'm saving up for now:
Nikon D3000 10.2MP Digital SLR Camera with 18-55mm f/3.5-5.6G AF-S DX VR Nikkor Zoom Lens

I'd love to hear your photography hints or what camera YOU use!

Mexican Hot Fudge Sauce - Vegan and Gluten-Free

Fudgy hot fudge chocolate sauce recipe with coconut milk
Decadent dairy-free hot fudge sauce. Vegan and gluten-free.


Now that there are some super fabulous gluten-free vegan ice creams out there (have you tried the coconut milk and almond milk based ice creams?) and we don't have to settle for less than delicious, I thought I'd reprise this silky chocolate sauce recipe from the archives. Because, you know. You may have missed it. And life is too short to live without fudge sauce.

In my book, anyway.


Continue reading

Cupcakes and Baking and Why You Need an Oven Thermometer

Before you bake these cupcakes, get an oven thermometer.

I attempted my first baking recipe yesterday. In the new apartment, that is. The kitchen is new, not the baker. I've been around the block a time or two when it comes to batter and dough (so if you're new to the blog, Darling, don't panic- I've got armloads of gluten-free recipes waiting for your brilliance to coax them to life). See that sparkling little cupcake gem above? Try it's zesty orangeness on for size. Because the recipe I was developing for you... Well. 

It failed. 

What was it? you idly wonder. Zucchini bread. A bread that should have been moist and tender and bursting with juicy bits of zucchini. A perennial August favorite I haven't sunk my teeth into since going gluten-free nine years ago. So I was due.

What happened?

Here's the thing. The thing I have to share with you that could change your gluten-free baking life. The back story: the stove is new. As in brand spanking new. No gluten has ever darkened it's white enamel door (a psychological plus). And it's a gas stove (heats quickly, super efficient). So what I am about to tell you may surprise you.

The oven temperature was off. As in way off.

How do I know? I had an inkling. I bought an oven thermometer. I installed it. And I set the oven temperature to 350 degrees F. When the preheat light went off I opened the oven door. It read 400 cussing degrees.


Continue reading

Wow! Wow! Wubbzy! COOKIES!

It wasn't until a few weeks ago that I even learned what a Wubbzy was (I'm old). My cousin's little girl, Violet (don't you LOVE that name?), was turning 3. Her party was Wow! Wow! Wubbzy! themed and she needed Wubbzy  cookies.

To tell you the truth, I was a little crushed that kids weren't watching Blue's Clues anymore. You see, Steve and I had a relationship. Some days, he was the only adult contact I had until my husband got home...and he and I became *thisclose*.  (Then he left and they brought Joe on board, who might have been cuter, but didn't have Steve's charm. But I digress.)

Back to Wubbzy....character cookies make me nervous. Just look at Batman. So, I took the chicken's way out and used my icing printer.

But, I think the key to these cookies is the sprinkles.

I really like edible image cookies with a decorative edge. That's probably because I never get them on exactly centered.  Here's an example of edible image cookies with a piped edge.

If you don't have an icing printer, you can usually have them printed for you at a bakery supply shop...call ahead, you'll probably need to format the image for them. I've even heard you can get them from the grocery store!

Just cut the images and peel away from the backing and place on wet royal icing.  Allow 2 days of drying time. For the sprinkles, mix equal parts meringue powder and water. Brush on the edges and sprinkle. Voila!

Happy birthday, Violet!

Now, I'm going to check hulu for my old friend Steve.