
You know what's weird? I was shopping at Crate & Barrel recently and these cookie cutters popped in my shopping basket. Strange how things like that happen.
I can already tell that this is going to be one of those cookie cutters that I use over and over again. They'd look cute in any color and would be darling for a birthday party or just as an "everyday" cookie.

This version is so, so simple. Two colors (I used brown and a light pink), some sprinkles and a few red sixlets. (I'm starting to love sixlets...remember those cherry cookies?)

For the cupcake cookies, you will need:
- cupcake sugar cookies
- royal icing, tinted with AmeriColor Chocolate Brown and Soft Pink
- disposable icing bag
- coupler and tips (#3 & #1)
- squeeze bottles
- toothpicks
- chocolate jimmies
- red sixlets (or a bit of red icing)

Using a #3 tip, outline the cookie in brown. (I like a larger tip here so the outline stands out.) Reserve some of this piping consistency for later.
Thin the brown and pink icings with water, a little at a time, until it is the consistency of thick syrup. Cover with a damp dishtowel and let sit several minutes.
Stir gently with a rubber spatula to pop any large air bubbles that have formed. Transfer to squeeze bottles.

Fill in the bottoms of the cupcakes in brown. Use a toothpick to guide to edges or pop and large air bubbles.

Flood the tops of the cupcakes with the pink icing, working about 6 at a time.

Leave the bottoms solid, or come back over the wet icing with a squiggle of pink icing going across.
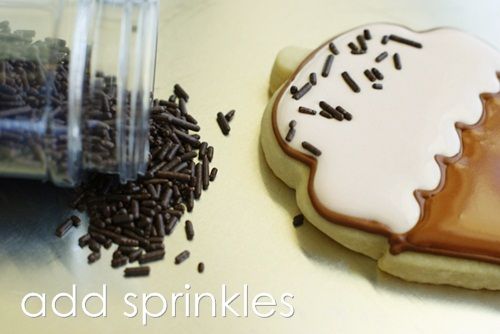
After flooding, sprinkle chocolate jimmies on the tops....don't worry, the icing won't dry before you get back to it.
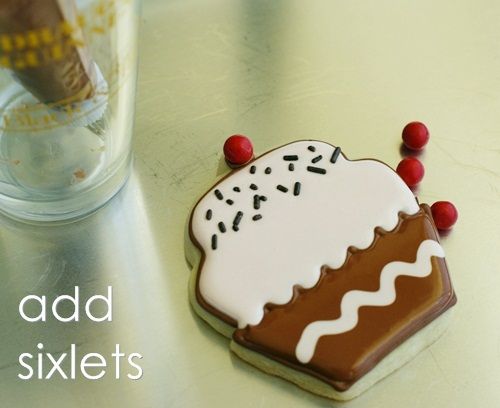
Add a bit of piping consistency royal icing to the top of the cookie to attach the sixlet. (If you don't have sixlets, just add a dot of red icing.)
Switch the tip on the brown icing to a #1 or #2 and pipe lines on the "wrappers" that don't have the pink squiggle.
Let dry 6-8 hours, or overnight.

That's it! Easy as pie cupcake!
No comments:
Post a Comment